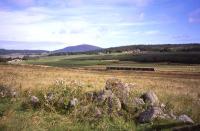
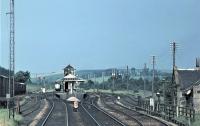
Cairnie Junction

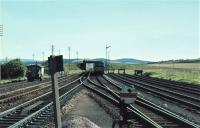
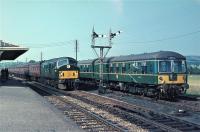
On the face of it, a quiet summer afternoon at Cairnie Junction in 1964. Not so, however. The Cravens DMU arrived a few minutes earlier from Elgin via the 'Glen' route (see 82826) and has moved into the siding pending the imminent arrival of loco-hauled northbound and southbound 'Coast' route services. The first to come in, arriving at the left-hand side of the island platform, will be a train from Aberdeen with an NBL Type 2(see 82781). The southbound train, also with an NBL Type 2, will come through the centre right-hand track before reversing back to the right-hand side of the platform to allow passengers to board or alight (see 82919). A quirk of the track layout at Cairnie was that there seems not to have been direct access to the platform for trains arriving on the track being used by the Type 2. This may have been a legacy from earlier days, when Coast and Glen trains joined forces at Cairnie. The Coast train was perhaps always expected to reverse on to a Glen portion before the combined train went on towards Aberdeen. Going back now to the afternoon of the photograph, the final act in the intensive burst of activity will take place after both Type 2s have gone and will be the movement of the DMU out on to the southbound main line then back to the left-hand side of the platform, before it heads off along the 'Glen' route. This last departure will take place a mere sixteen minutes after the original arrival of the DMU, to conclude a very smartly-run piece of railway operation!
Location: Cairnie Junction (former)
Original line: Great North of Scotland Railway
Operator: British Railways
Photographer: Brian Haslehust
Contact photographer: Brian Haslehust
Date: 31/08/1964
Image number: 83186
Other photographs of Cairnie Junction on RailScot
 |  |  |  |  |  |  |  |  |  |
